Building a scalable web site using AWS/Docker/Terraform
In the past I have written posts about using infrastructure as code to deploy your web applications in a repeatable and controllable fashion using the concept of infrastructure as code. Today I would like to give a concrete example of how this is done using word press deployed to AWS.
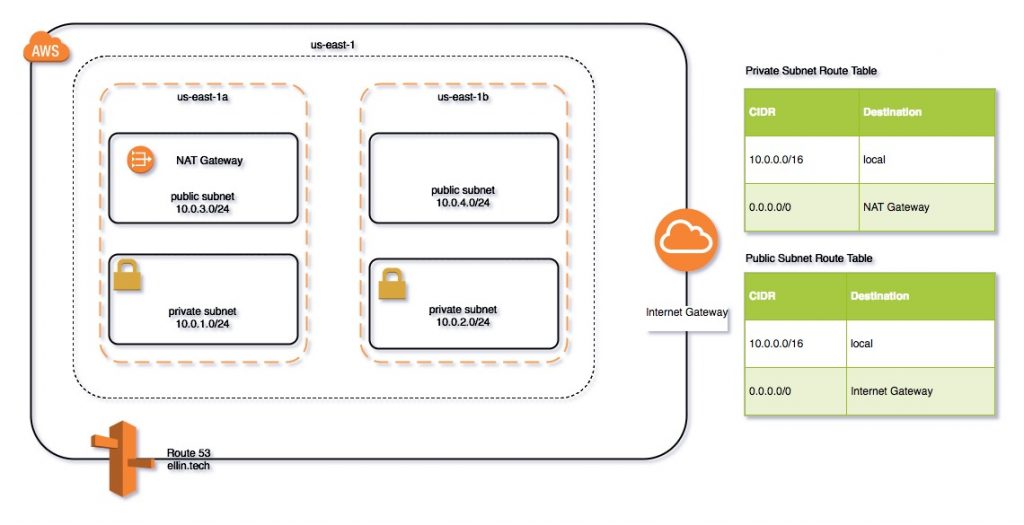
In the first section I will illustrate how to use Terraform to create the networking components required to support the environment.
We will illustrate how to define the following components as code.
- VPC – Virtual Private Cloud
- Subnets – both public and private in multiple availability zones.
- DNS – Route 53 configuration
- Security Groups
- NAT and Internet Gateways
- Route Tables
By the end of this post you should be able to use Terraform to apply the above configuration and deploy a test EC2 instance to the environment.
DNS
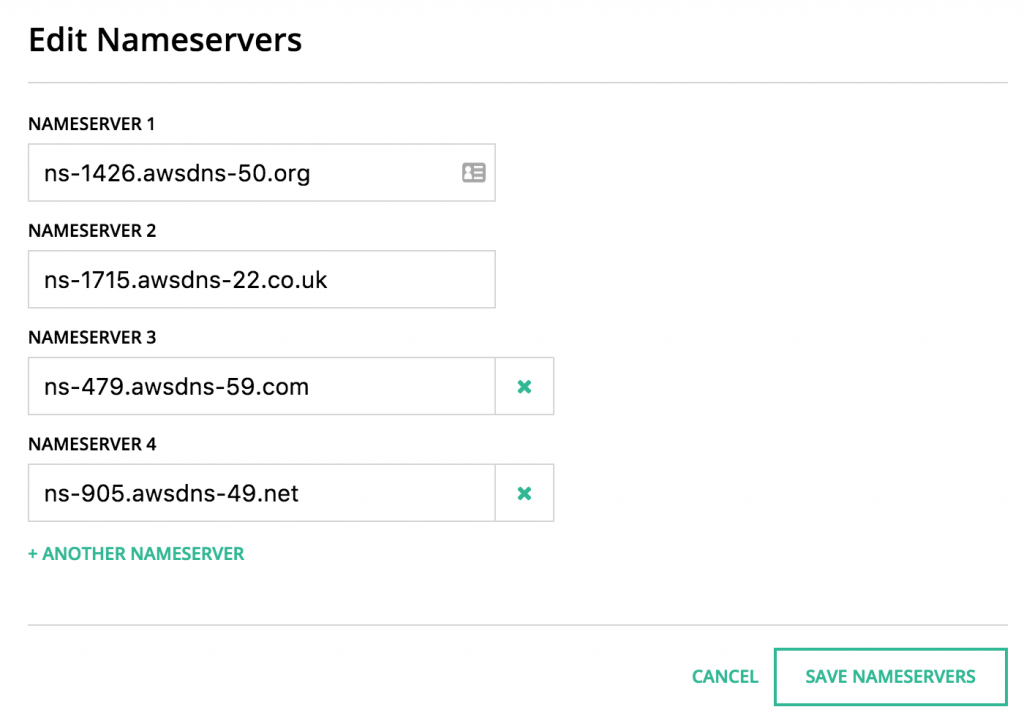
In order to complete this you will need to register a DNS name at your registrar of choice. For this demo I registered ellin.tech at hover.com for $7.99. After you apply the configuration using Terraform to AWS you can go back to your registrar and update the provided DNS servers.
Terraform
The terraform scripts are divided into sections based on Amazon services. The complete scripts are available
https://github.com/jeffellin/ellin.com/tree/master/wpdemo/ellin2
VPC
The first component to setup is a VPC or Virtual Private Cloud. The VPC is used as a networking container to deploy your resources such as EC2 instances, Load Balancers, RDS instances into. They control networking ingress and egress via Security Groups or Network ACLs and provide routing rules for networking traffic.
The first resource is the VPC. We must define a CIDR block. In addition we would like DNS hostnames to be automatically assigned to new instances.
resource "aws_vpc" "ellin-web" {
    cidr_block = "10.0.0.0/16"
    enable_dns_hostnames = true
    tags {
        Name = "ellin-web"
    }
}
Next we will define four subnets. Two public and two private. The public subnets will be internet facing while the private subnets will be only accessible from within the VPC. We use Terraform’s capability to look up availability zone names so that they are not hard coded if we decide to deploy the configuration to a different region.
resource "aws_subnet" "public-a" {
    vpc_id                  = "${aws_vpc.ellin-web.id}"
    cidr_block              = "10.0.1.0/24"
    map_public_ip_on_launch = "true"
    availability_zone = "${data.aws_availability_zones.available.names[0]}"
    tags {
    	Name = "public-a"
  	}
}
We will also need a NAT gateway and a Internet Gateway. These will provide inbound and outbound connectivity for the public subnets and outbound access for the private subnets. The NAT gateway requires us to provision a elastic IP address.
resource "aws_internet_gateway" "gw" {
    vpc_id = "${aws_vpc.ellin-web.id}"
    tags {
        Name = "ellin-web.internet_gateway"
    }
}

resource "aws_eip" "nateip" {
	 vpc      = true
}

resource "aws_nat_gateway" "natgw" {
  allocation_id = "${aws_eip.nateip.id}"
  subnet_id     = "${aws_subnet.public-a.id}"
}
Lastly we will create some route tables and assign them to the appropriate subnets.
resource "aws_route_table" "priv_nat_route_table" {
    vpc_id = "${aws_vpc.ellin-web.id}"
    route {
      cidr_block = "0.0.0.0/0"
      gateway_id = "${aws_nat_gateway.natgw.id}"
    }
}

resource "aws_route_table" "pub_igw_route_table" {
    vpc_id = "${aws_vpc.ellin-web.id}"
    route {
      cidr_block = "0.0.0.0/0"
      gateway_id = "${aws_internet_gateway.gw.id}"
    }
}
Route 53
Now that we have the VPC setup we can move onto Route 53. We will need to create a zone for the ellin.tech domain. We will also ask Terraform to output the 4 name servers that amazon has assigned.
resource "aws_route53_zone" "ellintech" {
   name = "ellin.tech"
   force_destroy = true
}
output "nameserver.1" {
    value = "${aws_route53_zone.ellintech.name_servers.0}"
}
Security Groups
For now we will go ahead and create two security groups. One for web traffic and one for database traffic. The web traffic group will allow ingress on ports 80,443 and 22. The db traffic group will allow ingress on ports 3306 and 22 but only from instances assigned to the web traffic group. This will ensure all ingress to the DB is from our web tier.
resource "aws_security_group" "web" {
    name = "web-traffic"
    description = "Allow inbound traffic"
    vpc_id = "${aws_vpc.ellin-web.id}"

    tags {
        Name = "web-traffic"
    }

    ingress {
        from_port = 22
        to_port = 22
        protocol = "tcp"
        cidr_blocks = ["0.0.0.0/0"]
    }

    ingress {
        from_port = 80
        to_port = 80
        protocol = "tcp"
        cidr_blocks = ["0.0.0.0/0"]
    }

    ingress {
        from_port = 443
        to_port = 443
        protocol = "tcp"
        cidr_blocks = ["0.0.0.0/0"]
    }

    egress {
        from_port = 0
        to_port = 0
        protocol = "-1"
        cidr_blocks = ["0.0.0.0/0"]
    }

}

resource "aws_security_group" "db" {
    name = "db-traffic"
    description = "Allow inbound traffic"
    vpc_id = "${aws_vpc.ellin-web.id}"

    tags {
        Name = "db-traffic"
    }

    ingress {
        from_port = 22
        to_port = 22
        protocol = "tcp"
        security_groups  = ["${aws_security_group.web.id}"]
    }

    ingress {
        from_port = 3306
        to_port = 3306
        protocol = "tcp"
        security_groups  = ["${aws_security_group.web.id}"]
    }


    egress {
        from_port = 0
        to_port = 0
        protocol = "-1"
        cidr_blocks = ["0.0.0.0/0"]
    }

}
Now that we have completed the configuration we can go ahead and apply the Terrforam configuration. using
terraform apply
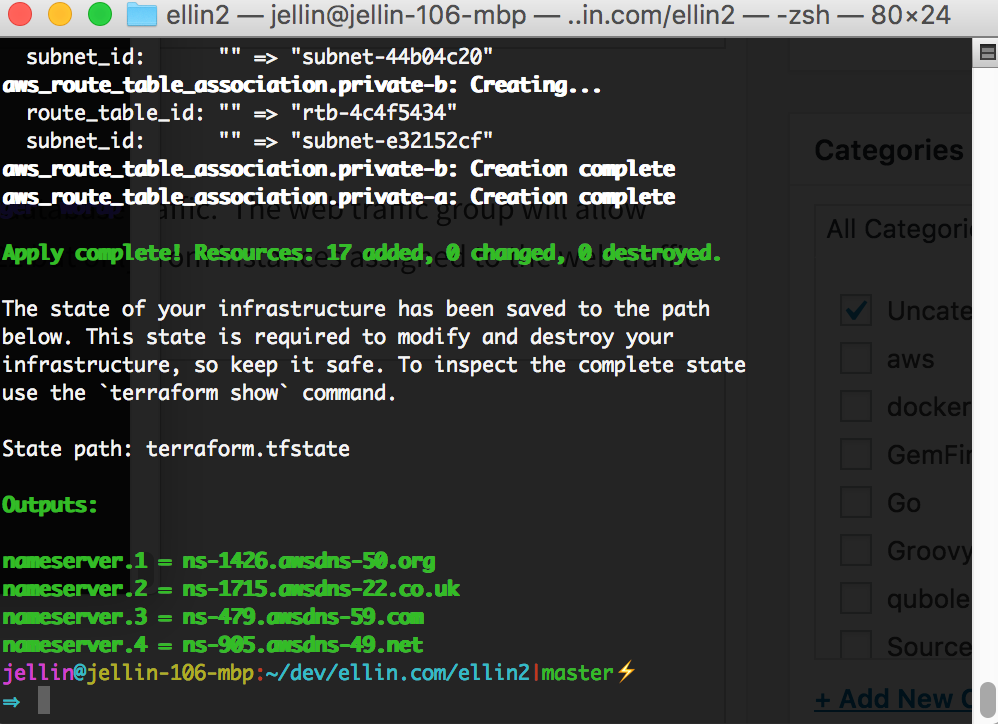
After the process is complete we can head on over to our domain registrar and update the outputted nameserver addresses.
In the next article we will learn how to launch an RDS to support our website as well as configure an EC2 instance to run WordPress on.
Continued in Part 2: adding RDS and WordPress
Posts in this Series
- Building a scalable web site using AWS/Docker/Terraform: adding elasticity
- Building a scalable web site using AWS/Docker/Terraform: adding redundancy
- Building a scalable web site using AWS/Docker/Terraform: odds and ends
- Building a scalable web site using AWS/Docker/Terraform: adding RDS and WordPress
- Building a scalable web site using AWS/Docker/Terraform