Building a scalable web site using AWS/Docker/Terraform: adding RDS and WordPress
In my last post I talked about using Terraform to use infrastructure as code principles to create a VPC environment to host a WordPress site. In this article we will deploy an RDS and an EC2 instance to host WordPress.
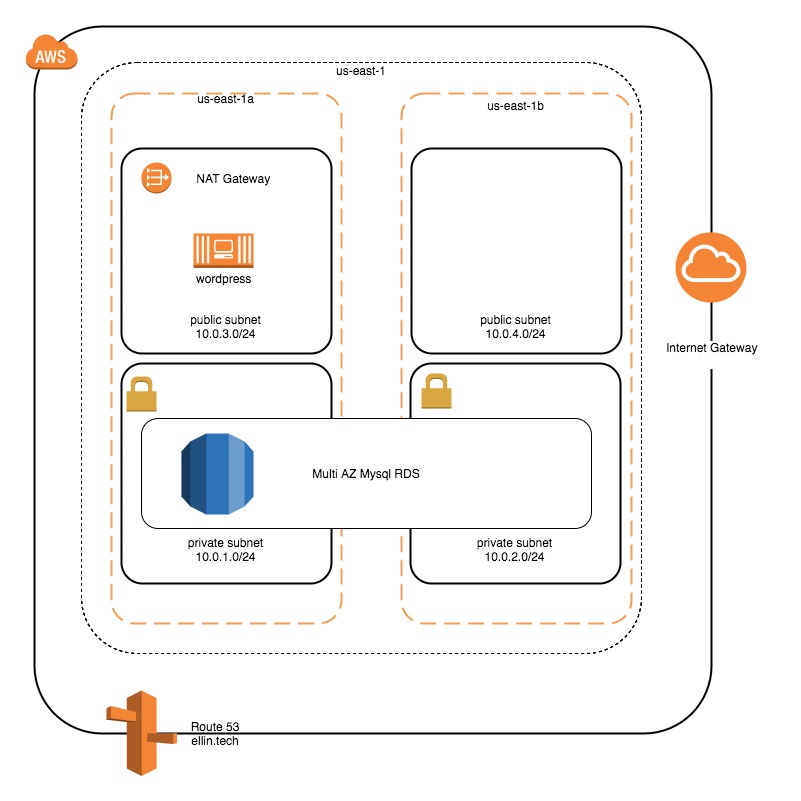
The RDS will live in two availability zones in US east. This will provide redundancy if the AZ hosting the primary replica is lost.
RDS
resource "aws_db_subnet_group" "dbsubnetgroup" {
  name        = "rds-subnet-group"
  description = "Our main group of subnets"
  subnet_ids  = ["${aws_subnet.private-a.id}", "${aws_subnet.private-b.id}"]
  tags {
    Project = "wordpress"
  }
}


resource "aws_db_instance" "wpdb" {
  depends_on             = ["aws_security_group.web"]
  identifier             = "wpdb"
  allocated_storage      = "10"
  engine                 = "mysql"
  engine_version         = "5.7"
  instance_class         = "db.t2.micro"
  name                   = "wpdb"
  username               = "wpdb"
  password               = "wpdbwpdb"
  multi_az               = "True"
  vpc_security_group_ids = ["${aws_security_group.db.id}"]
  db_subnet_group_name   = "${aws_db_subnet_group.dbsubnetgroup.id}"
  tags {
    Project = "wordpress"
  }
}

output "rdshost" {

  value = "${aws_db_instance.wpdb.address}"

}
For RDS we must create a subnet group to enumerate the availability zones we wish to host our database in. Once that is done we can create the MySQL instance in the already defined database security group. Lastly we want to output the hostname of the database so we can plug it into our EC2 bootstrap script.
EC2
resource "aws_instance" "docker" {
   ami = "${data.aws_ami.ubuntu_ami.id}"
   instance_type = "t2.micro"
   subnet_id = "${aws_subnet.public-a.id}"
   associate_public_ip_address = true
   key_name = "ellin-aws-us-east-1"
   vpc_security_group_ids=["${aws_security_group.web.id}"]
   #iam_instance_profile = "${aws_iam_instance_profile.web_profile.name}"
   user_data = "${data.template_file.bootstrap.rendered}"

}

##Lookup AMI

data "aws_ami" "ubuntu_ami" {
  most_recent = true
  filter {
    name = "name"
    values = ["ubuntu-trusty-14.04-amd64-server*"]
  }
}

output "ec2_address" {
    value = "${aws_instance.docker.public_dns}"
}


data "template_file" "bootstrap" {
    template = "${file("bootstrap.tpl")}"
      vars {
        dbhost = "${aws_db_instance.wpdb.address}"
  }
}
For the EC2 instance we need to launch the instance using our desired AMI. In addition we need to pass along the DB host to our user data script. We use a template for the script and pass in the host name returned by terraform.
#!/bin/bash -xe
whoami
apt-get -y update
apt-get -y install unattended-upgrades
curl 'https://bootstrap.pypa.io/get-pip.py' -o 'get-pip.py'
python get-pip.py
pip install awscli
apt-key adv --keyserver hkp://p80.pool.sks-keyservers.net:80 --recv-keys 58118E89F3A912897C070ADBF76221572C52609D
echo 'deb https://apt.dockerproject.org/repo ubuntu-trusty main' > /etc/apt/sources.list.d/docker.list
apt-get -y update
apt-get -y install docker-engine
apt-get -y install fail2ban
pip install docker-compose
docker run -d -e WORDPRESS_DB_HOST=${dbhost}:3306 -e WORDPRESS_DB_PASSWORD=wpdbwpdb -e WORDPRESS_DB_USER=wpdb -e WORDPRESS_DB_NAME=wpdb -p 80:80 wordpress:latest
The bootstrap prepares the AMI by installing updates, installing the docker engine and starting wordpress.
Route53
Lastly we need to add a DNS record set for our EC2 instance. We add a regular A record for the EC2 instance public IP address and an DNS Alias to handle the bare apex record ellin.tech.
resource "aws_route53_record" "www_cc" {
   zone_id = "${aws_route53_zone.ellintech.zone_id}"
   name = "www.ellin.tech"
   type = "A"
   ttl = "300"
   records = ["${aws_instance.docker.public_ip}"]
}

resource "aws_route53_record" "apex" {
  zone_id = "${aws_route53_zone.ellintech.zone_id}"
  name    = "ellin.tech"
  type    = "A"

  alias {
    name                   = "www.ellin.tech"
    zone_id                = "${aws_route53_zone.ellintech.zone_id}"
    evaluate_target_health = "false"
  }
}
Once the terraform script is applied we should be able to navigate to ellin.tech and see the WordPress welcome screen.
One thing you may have noticed is that we did not use an Elastic IP Address for the EC2 instance. This means that if we stop the instance and restart it the DNS entry for ellin.tech will no longer work. This is because the public IP will change after reboot. I will show you how to deal with this by adding an ELB in the next post when we talk about scaling the number of WordPress EC2 instances.
Code for this section can be found at https://github.com/jeffellin/ellin.com/tree/master/wpdemo/ellin3
While it may be possible to copy the terraform state file from the previous section into the terraform for this section I can not guarantee it will work. It’s best to remove the resources from the previous section before proceeding.
Continued in: Building a scalable web site using AWS/Docker/Terraform: Adding Redundancy
Posts in this Series
- Building a scalable web site using AWS/Docker/Terraform: adding elasticity
- Building a scalable web site using AWS/Docker/Terraform: adding redundancy
- Building a scalable web site using AWS/Docker/Terraform: odds and ends
- Building a scalable web site using AWS/Docker/Terraform: adding RDS and WordPress
- Building a scalable web site using AWS/Docker/Terraform