Building a scalable web site using AWS/Docker/Terraform: adding elasticity
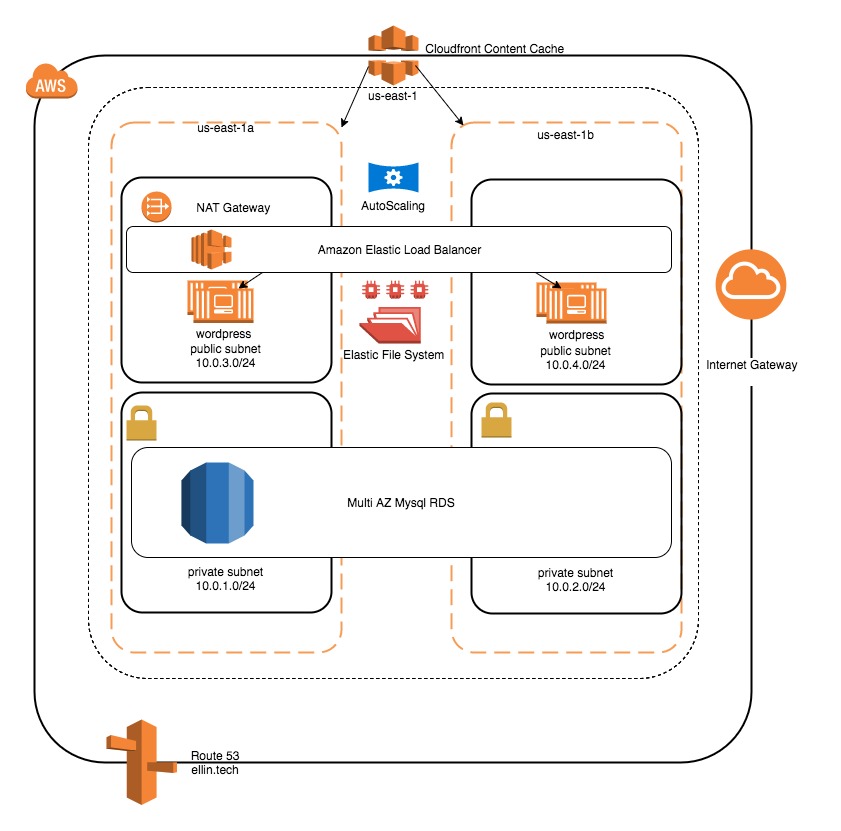
In order to cope with increased demand we need a method to add additional capacity when required. To do this we can utilize cloud watch alarms to trigger our autoscaling group. By having additional nodes in the web tier we can increase our capacity. When the demand tapers off we can remove nodes. We can also use Cloud Front to distribute our images, javascript and css to edge nodes that are closer to the users.

Autoscaling
First we will add two policies. These policies will result in a change in capacity of +2 nodes or -2 nodes.
resource "aws_autoscaling_policy" "wordpresspolicy" {
  name                   = "wordpress-policy-high"
  scaling_adjustment     = 2
  adjustment_type        = "ChangeInCapacity"
  cooldown               = 300
  autoscaling_group_name = "${aws_autoscaling_group.wp_group.name}"
}

resource "aws_autoscaling_policy" "wordpresspolicylow" {
  name                   = "wordpress-policy-low"
  scaling_adjustment     = -2
  adjustment_type        = "ChangeInCapacity"
  cooldown               = 300
  autoscaling_group_name = "${aws_autoscaling_group.wp_group.name}"
}
We can then use two alarms to trigger the autoscaling policy.
resource "aws_cloudwatch_metric_alarm" "cpuhigh" {
  alarm_name          = "wordpress-cpu-high"
  comparison_operator = "GreaterThanOrEqualToThreshold"
  evaluation_periods  = "2"
  metric_name         = "CPUUtilization"
  namespace           = "AWS/EC2"
  period              = "120"
  statistic           = "Average"
  threshold           = "80"

  dimensions {
    AutoScalingGroupName = "${aws_autoscaling_group.wp_group.name}"
  }

  alarm_description = "This metric monitors ec2 cpu utilization"
  alarm_actions     = ["${aws_autoscaling_policy.wordpresspolicy.arn}"]
}

resource "aws_cloudwatch_metric_alarm" "cpulow" {
  alarm_name          = "wordpress-cpu-low"
  comparison_operator = "LessThanOrEqualToThreshold"
  evaluation_periods  = "2"
  metric_name         = "CPUUtilization"
  namespace           = "AWS/EC2"
  period              = "120"
  statistic           = "Average"
  threshold           = "25"

  dimensions {
    AutoScalingGroupName = "${aws_autoscaling_group.wp_group.name}"
  }

  alarm_description = "This metric monitors ec2 cpu utilization"
  alarm_actions     = ["${aws_autoscaling_policy.wordpresspolicylow.arn}"]
}
When the CPU Utilization exceeds 80% on average across all our nodes we will add 2 additional nodes. When the CPU Utilization falls below 25% on average we will remove 2 nodes from the pool.
We can test that this works by using a utility called stress. SSH into both of your webnodes and run
sudo apt-get install stress
stress -c 90
This will bring the cpu on both nodes to 90%.
Logging back into the Amazon console you should see the additional nodes added

Once you terminate the stress program the instances will terminate next time CloudWatch triggers the scale down policy.
CloudFront
Lastly we will bring CloudFront into the picture. CloudFront is a Content Delivery Network. The idea is that static content such as images can be serviced from a web endpoint that is closer to the user. This reduces latency to load the asset as well as relieves the pressure off of your web server. The CDN will load the images directly from your origin if they are not currently present in the cache.
resource "aws_cloudfront_distribution" "wp_distribution" {
  origin {
    domain_name = "ellin.tech"
    origin_id   = "wp_distribution"
    custom_header
      {
        name  = "X_CDN"
        value = "AMAZON"
      }
}
The CDN api requires a lot of values that I haven’t listed here. Please see the code on GitHub for a complete example.
The CDN will pass a header X_CDN every time it makes a request. This is to prevent an endless loop when we redirect calls for images to the CDN. When the header is present the webserver will return the image to the CDN rather than a redirect.
<IfModule mod_rewrite.c>
RewriteCond %{HTTP:X_CDN} !=AMAZON
RewriteRule ^wp-content/uploads/(.*)$ http://d26i56ogve6d7p.cloudfront.net/wp-content/uploads/$1 [r=301,nc]
</IfModule>
The above rewrite rule added to the .htaccess will force all calls to the wp-content/uploads directory to be redirected.
grep "RewriteCond %{HTTP:X_CDN}" /efs/wordpress/.htaccess ||
        echo $'<IfModule mod_rewrite.c>\nRewriteCond %{HTTP:X_CDN} !=AMAZON\nRewriteRule ^wp-content/uploads/(.*)$ http://${cloudfront}/wp-content/uploads/$1 [r=301,nc]\n</IfModule>' >> /efs/wordpress/.htaccess
The above line was added to the bootstrap.tpl and will add the rewrite rule to the .htaccess file if it doesn’t exist. We need to check to see if its present as the .htaccess file lives on the EFS and only needs to be updated the first time its created.
Running terraform apply will update the website with this new configuration. Since the launch configuration has changed go ahead and terminate any running EC2 instances via the console. The autoscaling group will restart them running the new bootstrap. Once the CDN is provisioned you should see the images that you have uploaded to the Media Library start appearing. In most cases the CDN does take about 15 minutes to fully setup so be patient.
An astute reader may notice that this approach of using URL rewrites results an additional round trip for the client. The client must retrieve the original request from the server and then be redirected to the CDN. Its beyond what I planned to cover in these blog posts but it is possible in Word press to use a plugin to force the URLs to be rewritten as the page is rendered so as to avoid the extra round trip.
Code for this section can be found at https://github.com/jeffellin/ellin.com/tree/master/wpdemo/ellin6
Continued in: Building a scalable web site using AWS/Docker/Terraform: odd and ends
Posts in this Series
- Building a scalable web site using AWS/Docker/Terraform: adding elasticity
- Building a scalable web site using AWS/Docker/Terraform: adding redundancy
- Building a scalable web site using AWS/Docker/Terraform: odds and ends
- Building a scalable web site using AWS/Docker/Terraform: adding RDS and WordPress
- Building a scalable web site using AWS/Docker/Terraform